


Halftime Recap: Lessons So Far
It’s early June and I’ve completed 50 of my 100 loaves of bread, so here’s the Halftime Recap of the game so far.
I’m happy with my progress – I thought I’d be farther along in the varieties of breads that I’ve baked, but I’m much more confident with my skills than I thought I’d be (especially after the large number of early failures). Below, I highlight some of the biggest lessons I’ve learned about techniques, ingredients, tools, and recipes. First, though, some stats:
“50” Loaves of Bread =
Total full loaves: 130
Mini baguettes (or equivalent): 43
Dinner rolls: 20
Total individual items of bread shaped: 193
Types of bread:
12 batches of Sourdough (SFBI and Reinhart)
8 batches of Reinhart’s Lean
6 batches of Ciabatta
4 batches of My Original 9 Grain
20 batches of 15 other recipes
Ingredients
Basic bread uses only four ingredients: flour, water, salt and yeast. I haven’t experimented with different waters, but I have learned about the other three ingredients:
Flour

The Contenders.
However, there may be a significant difference between flours used to feed a sourdough starter. The bit I understand about the biology would support this (flour comes with yeast and bacteria spores in it which could affect its makeup). I also did not like the flavor of my first sourdough starter or the SFBI starter that I fed and grew. These were both made with Gold Medal flour. My third try at sourdough starter has worked beautifully and I like the flavor. I have been using King Arthur exclusively for that. I will need to do a feeding experiment to see if my hunch is correct.
Salt

1 tsp is not 1 tsp
Yeast

Active Dry vs. Instant Dry Yeast
In the world of sourdough, I tried three different times to grow my own starter. The third try was the most successful and also the simplest. The process was from Chad Roberson’s “Tartine Bread” book – it uses a different ratio of flours and water than my other recipes, and I also changed the flour I used from Gold Medal to King Arthur. I kept meticulous records the third time and was able to understand better the process that the yeasts and bacteria are going through – details of that can be found in this post.
Techniques
Getting good at anything, whether it’s playing an instrument, drawing, photography, woodworking or baking bread, involves getting comfortable with the techniques, processes and tools. As you get more proficient the fear goes away and you begin to understand what is happening. At this point you know what is and isn’t important and can begin to improvise. A large part of my learning has been in this area.
Weights and Ratios
A cup of flour can vary in quantity by half (or double). Likewise with salt (table vs. coarse for example). By using weight instead of volume you can consistently and accurately measure your ingredients. I’ve also learned that the amount of salt relative to the amount of flour is crucial to the flavor and yeast development in the bread. The ratio of water to flour determines a lot about the character of the dough, and thus how open the crumb is, but is much less critical than I had originally thought.
Getting a Crispy Crust with Steam
I learned at Loaf 2 about the magic of using steam to get a nice crispy crust. (Water in a pan in the oven while you bake the bread creates steam that keeps the crust from forming while the bread is rising. After the steam is gone, the crust bakes golden and crunchy.) I learned much later on that you need to vent the steam out of the oven at about the 18 minute mark to get the crust to stay crispy. If you don’t vent the oven the crust will soften the next day and you’ll have to reheat the bread to get the crunchy crust back.
Scoring the Loaf

Lames
Touch
I started out heavily reliant on our Kitchen Aid to do the mixing. In fact, I even considered that I might want to upgrade to a bigger model. In my class at SFBI I learned the beauty and wonder of just going all in with your hands. It sounds strange, but there is an intimacy you develop with the dough where you begin to feel its character. Over time I could tell by feel if it was mixed enough and how far along the gluten development has gotten. It is an important part of the TLC that adds flavor to the bread. I am also developing a sense of how much the dough has risen just by holding it – there is an expectation of density (weight vs. size) that is becoming more natural.
I’m also starting to understand the “poke test” – where you poke the loaf to see if it has proofed (risen) enough to bake. Everyone (either in class or in books or blog posts) says that you poke the bread and see how long it takes for the indentation to come back. If it rises back slowly it’s ready to bake, too fast and you need to wait more, not at all and you’ve over-proofed it (too bad!). I’ve found that you’re feeling the resistance of the dough also – it should be very soft and offer almost no resistance.
Recipes
Basic bread recipes are very simple: flour + water + yeast + salt. The proportions and process are what determine the different types of bread. After the basics you can start adding other things to add more interest – nuts, seeds, honey or sugar, milk, eggs…
Baker’s Formula
“Real” bread recipes do everything by percentages, with the weight of flour being 100% and weights of all other ingredients relative to that. This makes it really easy to scale a recipe to however many loaves of bread you want to make. I ended up creating a Bread Calculator spreadsheet where I can enter ingredient percentages along with the final weight of the dough that I want and it spits out the rest. Salt is almost always 2% (so you’d use 20g of salt for 1000g of flour), yeast is usually around 1%, and the amount of water determines the hydration (below).
Hydration
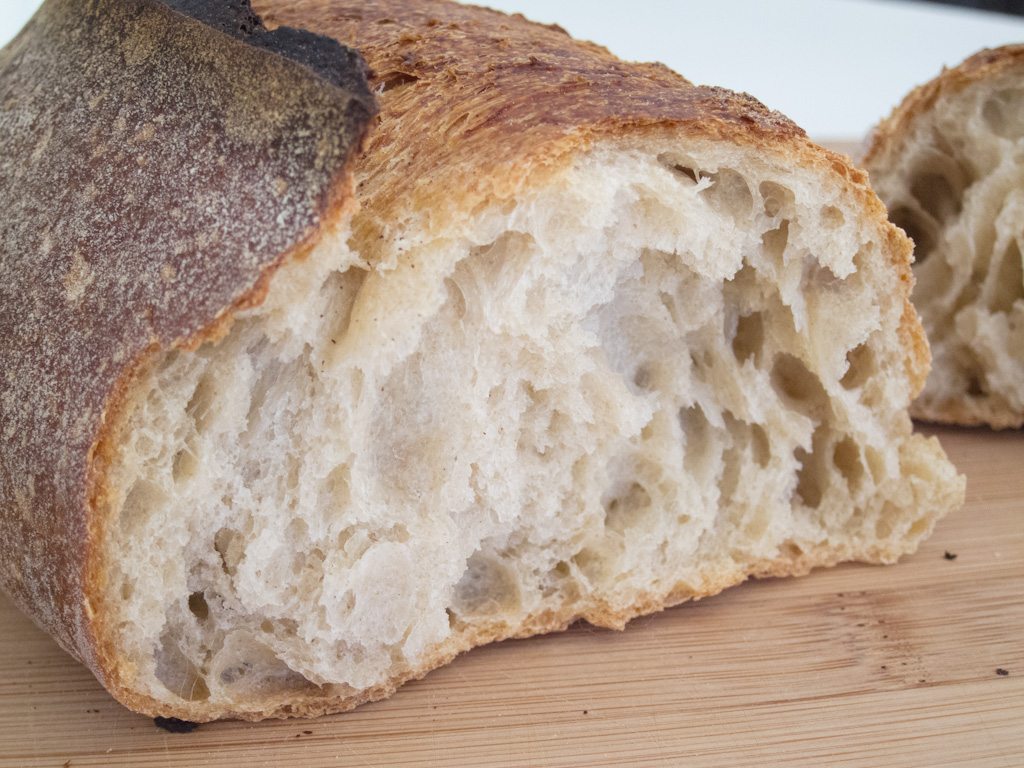
Once I understood baker’s percentages, I understood hydration. This is the ratio of water to flour – 75% hydration means there is 75% the weight of water compared to the weight of the flour (750g water to 1000g flour). Ciabatta is a sticky wet dough that is almost impossible to shape because it is so slack – it is 80% hydration. The SFBI sourdough I’ve made is 67% hydration and it is a stiffer dough. Generally more water means bigger holes but more difficulty in shaping.
Stages and Process
I’ve enjoyed learning this part of the process – it’s magical to start with raw ingredients and see them transform at each step into something new. Mix, rest, pre-shape, rest, shape, proof, bake – the seven basic steps to making artisan breads. The mix stage incorporates the ingredients into a sticky mass, allowing the flour to absorb the water and the gluten to form. There is some stretching and folding every half hour to help it along, and the ingredients become a uniform soft dough. Pre-shaping is the step of dividing the dough into individual loaf amounts and getting them ready for final shaping. The pre-shaped loaves rest again for about half an hour. Shaping each loaf only takes a moment and is your opportunity to get creative with what the final outcome will look like. Proofing is when the dough does most of its rising. For the breads I’ve made this is a two to four hour process – it’s a little tricky to tell when the loaf has proofed enough, I tend to under-proof them but I’m learning to be more patient at this stage. The loaves are then scored right before baking to direct where they will expand during the oven ‘pop.’ I love watching the final baking stage, it’s like Bread TV. The loaves magically rise as the yeast makes its final stand, the scored tops stretch and tear, and finally the crust becomes a golden brown with charred edges.
Tools
Making bread is not tool intensive. My minimum set of tools would be a scale, a big bowl, a bench scraper, a razor, and a pizza stone for the oven. Thermometers (for water and dough temperature, for room temperature, and for oven temperature) all help for consistency. A bucket for rising dough and starter in that makes it easy to measure is a nice luxury. I think I’d add a notebook to my must-have list, since good record keeping drastically accelerates the learning curve.
Everything else, like bannetons and couches, make things easier but not necessarily better.
Other/Resources
I’m very happy I took a beginners class at Sur Le Table and then a more serious weekend class at the San Francisco Baking Institute. Working with and learning from people who know what they are doing is the fastest way to develop confidence in your own ability.
Along that line, websites with active forums have been very helpful, too. I’m a lurker so I read but don’t actively participate in the forums, but reading the conversations and debugging processes that others are going through is extremely helpful. My favorite website is www.thefreshloaf.com – friendly people in a very supportive group.
I use a small number of books, all listed on this site under the Resources tab, and watch a lot of videos on YouTube.
Finally, the part I like best about baking bread is that people love bread. It makes for good conversation and friendly personal gifts.